Back

The D.I.Y. Manual Boost Controller
Installation instructions

*before installing any type of MBC you MUST have an aftermarket boost gauge installed

You will require:
  • length of 1/8" I.D. vacuum hose [or equivalent]
  • (1) 1/8" plastic tee [or equivalent]
  • (2) 1/8" rubber cap [or equivalent, a piece of vacuum hose with a bolt will work too)
  • zip ties

Procedure:

  1. Determine where you wish to mount the MBC. Find an area that is easily accessible, so it can be adjusted without difficulty. Mounting to the radiator cooling fan shroud as seen in the aside picture, for example, is convenient.
  1. Before connecting the boost controller you must disconnect the BCS (Boost Control Solenoid) plumbing from the waste gate, air can and turbo outlet.

Note: If you have the Knock LED mod installed in your car you likely have the resistor1 installed inline with the LED circuit and must leave the BCS connected electrically. If you do not have the Knock LED mod, or wish to remove the resistor1 from it’s ‘inline’ position, you can install the resistor1 into the connector for the BCS after removing it.

-For information on the Knock LED mod see the following url http://members.home.net/dsmweb/ledmod/ courtesy of Damian Sigman
-resistor1 is the appropriate resistor value for the LED used in the above mod, either as described in the mod, or calculated for your specific LED

  1. Using the below plumbing schematic, cut the vacuum hose to an appropriate length and connect to the MBC. Secure all connections with zip ties and the MBC in it’s mounting position.
  1. Cap off the nipple on the air can and the turbo outlet with the rubber caps. Secure them with a zip tie as the example in the aside picture depicts for the turbo outlet.

NOTE: due to minor revisions to the MBC it is no longer necessary to install a straight through coupling with a small hole, described as the ‘Bleeder’ in my FAQ. The bleed feature has now been incorporated into the body of the MBC (small hole drilled into the body)

Adjusting the MBC:

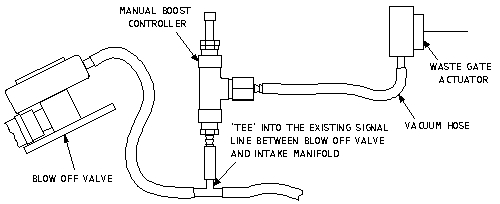
It is critical that the MBC be adjusted before you drive your car under sustained boosted conditions; Failing to do so could result in boost levels higher than the engine maybe capable of maintaining, leading to possible engine damage. I have preset the MBC at approximately 15psi of boost to provide a basic adjustment starting point. This may be slightly higher or lower on your car.

After you have installed the MBC, gently drive your car in a controlled environment (ie. empty parking lot or unused country road) gradually ease on the accelerator building boost and noting maximum pressure on the boost gauge. Under any circumstance DO NOT operate your car over the maximum known sustainable boost pressure according to other modifications completed. If you are not sure what the maximum sustainable boost pressure for your DSM is, do not exceed 13psi.

To Increase boost:

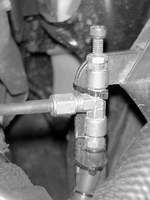
Loosen the jam nut off gently and turn the bolt in (clockwise). Adjustments are very minute, so do them in small increments, adjust, test, adjust, test…etc. failing to do so could result in generating extremely high boost levels and damaging your engine.

To Decrease boost:

Loosen the jam nut off gently and turn the bolt out (anti-clockwise). Adjustments are very minute, so do them in small increments.

Once you have achieved your desired boost level setting, tighten the jam nut down against the body of the MBC. This will lock the bolt into place.

Failing to tighten the jam nut could result in the bolt backing itself out which would create higher than desired boost levels. The worst case would be loss of the bolt and internal components, resulting in complete loss of control over boost. Note: in the year that I have used this controller, I have never had any problems of this type, but I must make you aware of the possibilities that it can happen if it’s not properly maintained.

Back